


Cinchy as its slogan says "Cinchy is the Dataware platform that makes integration obsolete". Basically cinchy will become the backend in your development, there you can store data, structure it, manage it, among many other options it provides.
Cinchy has several methods by which you can interact with the data, among which are:
- Basic Auth
- Autorization Token
- Angular and Javascript SDK
You can find more information about it in the official Cinchy documentation.
In this post I will focus on the use of the SDK. It is possible that in your development you will run into several insidents why you cannot perform queries. This can be due to several reasons that will be addressed as you read on.
Contents
- Configuration in Cinchy
- Configuration in code
- SSL Usage
Configuration in Cinchy
As the cinchy documentation says it is necessary to register a new client, to do so look for the following table in your cinchy dashboard (if you can't see it you will need to ask an administrator for that configuration)
Here is an example of the data to be entered:
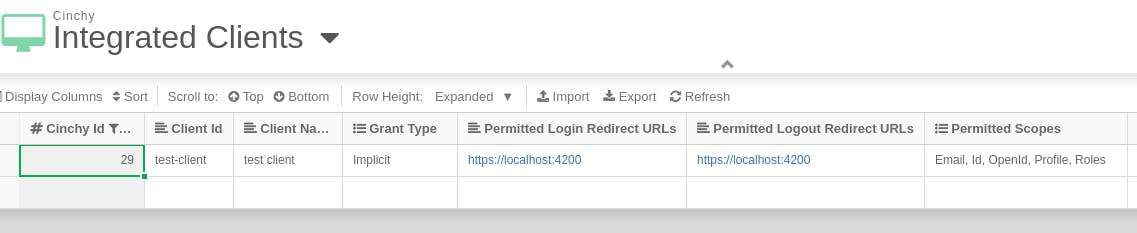
for more information about the fields click here
You may wonder why in the URL sections HTTPS was used instead of HTTP, this will be explained more clearly in the SSL Usage section.
If you have completed this first item proceed to the next one.
Configuration in code
First follow the recommendations in the sdk documentation del sdk para su instalacion for installation.
After that we will use as an example the configuration given in the documentation:
// Import CinchyService to make API calls and CinchyConfig to configure the service
import { CinchyService, CinchyConfig } from '@cinchy-co/angular-sdk';
...

// Create a config (as a class of CinchyConfig) to be loaded into CinchyService
export const MyCinchyAppConfig: CinchyConfig = {
  // The root url of your Cinchy instance
  cinchyRootUrl: 'http://my.cinchy.instance.co',
  // The url of your Cinchy IdentityServer
  authority: 'http://my.cinchy.instance.co/cinchyssocore',
  // The redirect url after logging in
  redirectUri: 'http://my-app-url/',
  // The client id for your applet
  clientId: 'my-applet-id',
  // (Optional) The redirect url after you logout
  logoutRedirectUri: 'http://localhost:3000/',
  // (Optional) The requested scopes for the applet (must be permitted for the client)
  // You must have openid and id requested
  scope: 'openid id email profile roles',
  // (Optional) Enable silent refresh
  silentRefreshEnabled: true,
  // (Optional) (Mandatory if silentRefreshEnabled = true) The silent refresh url
  silentRefreshRedirectUri: 'http://localhost:3000/silent-refresh.html'
};
We will replace the basic data needed using the table image we already had previously. Replacing we have the following configuration:
import { CinchyService, CinchyConfig } from '@cinchy-co/angular-sdk';
...

export const MyCinchyAppConfig: CinchyConfig = {
  cinchyRootUrl: 'https://my.cinchy.instance.co',
  authority: 'https://my.cinchy.instance.co/cinchyssocore',
  redirectUri: 'https://localhost:4200',
  clientId: 'test-client',
  logoutRedirectUri: 'https://localhost:4200',
};
With this configuration you will be able to access the login window and be redirected to your application with an authorization token for queries.
SSL Usage
Most likely you will be able to log in but you will have CORS problems to perform queries, you may get a problem similar to the following:

This is because by default the server in the local environment runs on its localhost using http but in this case the cinchy instance is running on a domain that uses SSL so it is not using http it is using https which is preventing it from making queries.
To solve it is simple for it is required that in this case the server is not executed in http://localhost:4200, it must be executed in https://localhost:4200, angular has a possibility to execute its server using ssl, the simple solution in some cases would be to execute the following:
ng serve --ssl
Already in this step you could be running your server in https://localhost:4200 but the browser recognizes it as insecure for this you need to make security certificates that the browser recognizes.
The following repository will be used for this purpose: github.com/RubenVermeulen/generate-trusted-..
Follow the steps indicated in the README and with just the command bash generate.sh you will be able to generate 2 files : server.crt and server.key.
As next step you need to install the certificates on your computer, either Windows, Linux or Mac, each one has different processes so these will not be explained here.
After installing the certificate you need Angular to use them for this you can modify your project file package.json by modifying the line "start": "ng serve" and you can put the following:
"start": "ng serve --port 4200 --ssl --ssl-key [path on your computer to the server.key file] --ssl-cert [path on your computer to the server.crt file]",
At the end of these steps your server will successfully run on https://localhost:4200 and the browser will recognize it as secure, therefore you will have solved the CORS error.